Code Split technique
Code-splitting can enhance your app's performance by "lazy-loading" only the resources currently needed by the user. This approach may not reduce the total amount of code in your app, but it can prevent loading unnecessary code and minimize the code needed for the initial load.
Dynamic import can be used for lazily loading heavy content. This enables user interaction with the app before the entire content is loaded. The React.lazy function allows you to render a dynamic import like a standard component. The lazy component should be rendered within a Suspense component, which lets us display fallback content (like a loading indicator) while waiting for the lazy component to be ready.
const Globe = React.lazy(() => import('../globe'))Where can this be applied? It can be used with heavy components that aren't necessary to load during the initial page rendering, such as an image or a modal that only appears upon user interaction.Note: for this to work properly, the component to be rendered must have a default export.
Example:
import * as React from 'react';

const Globe = React.lazy(() => import('../globe'));

function App() {
  const [showGlobe, setShowGlobe] = React.useState(false);

  return (
    <div
      style={{
        display: 'flex',
        alignItems: 'center',
        flexDirection: 'column',
        justifyContent: 'center',
        height: '100%',
        padding: '2rem',
      }}
    >
      <label style={{marginBottom: '1rem'}}>
        <input
          type="checkbox"
          checked={showGlobe}
          onChange={e => setShowGlobe(e.target.checked)}
        />
        {' show globe'}
      </label>
      <div style={{width: 400, height: 400}}>
        <React.Suspense fallback={<div>loading globe...</div>}>
          {showGlobe ? <Globe /> : null}
        </React.Suspense>
      </div>
    </div>
  )
}

export default App;
Eager Loading
This technique is used when a user indicates a desire for a certain content to load. It's applicable in scenarios such as a landing page with multiple sections. As we scroll or move the cursor near the next section, the upcoming section can be eager-loaded.
Example: on this first example, we're loading the content in a third section of a page after we scroll on the second second.
import React, { useEffect, useState } from 'react';
import dynamic from 'next/dynamic';
import Section1 from '../Section1';
import Section2 from '../Section2';

const Section3 = dynamic(() => import('../Section3'));
const Section4 = dynamic(() => import('../Section4'));

const GeneralSection = () => {
  const [showEagerLoaded, setShowEagerLoadedSections] = useState(false);

  useEffect(() => {
    const onScroll = () => {
      // Adjust this value based on your layout and where Section 2 ends
      const section2Bottom =
	      document.getElementById('section-2').getBoundingClientRect().bottom;

      if (window.scrollY > section2Bottom - window.innerHeight) {
        setShowEagerLoadedSections(true);
      }
    };

    window.addEventListener('scroll', onScroll);
    return () => window.removeEventListener('scroll', onScroll);
  }, []);

  return (
    <>
      <Section1 />
      <Section2 id="section-2" />

      {showEagerLoaded && (
        <React.Suspense fallback={<div>Loading...</div>}>
          <Section3 />
          <Section4 />
        </React.Suspense>
      )}
    </>
  );
};

export default GeneralSection;
Example 2: In this example, we can see how could we apply the lazy loading to the first example we have, regarding the globe.
import * as React from 'react';

const loadGlobe = () => import('../globe');

const Globe = React.lazy(loadGlobe);

function App() {
  const [showGlobe, setShowGlobe] = React.useState(false);

  return (
    <div
      style={{
        display: 'flex',
        alignItems: 'center',
        flexDirection: 'column',
        justifyContent: 'center',
        height: '100%',
        padding: '2rem',
      }}
    >
      <label style={{ marginBottom: '1rem' }} onMouseEnter={loadGlobe} onFocus={loadGlobe}>
        <input
          type="checkbox"
          checked={showGlobe}
          onChange={e => setShowGlobe(e.target.checked)}
        />
        {' show globe'}
      </label>
      <div style={{ width: 400, height: 400 }}>
        <React.Suspense fallback={<div>loading globe...</div>}>
          {showGlobe ? <Globe /> : null}
        </React.Suspense>
      </div>
    </div>
  )
}

export default App;
Webpack magic comments
Using Prefetching/Preloading modules while declaring your imports allows webpack to output “Resource Hint” which tells the browser that for:
- prefetch: resource is probably needed for some navigation in the future
- preload: resource will also be needed during the current navigation
The prefetch can be achieved by importing your module with the following magic comment:
import(/* webpackPrefetch: true */ './some-module.js')This will result in code below being appended in the head of the page, which will instruct the browser to prefetch in idle time the ./some-module.js file.
<link rel="prefetch" as="script" href="/static/js/1.chunk.js">The prefetch's functionality depends on how you're using Server Side Rendering (SSR):
- Chunk Loading on Server: In a client-side environment, Webpack handles the loading of chunks (split code bundles) dynamically at runtime. However, in an SSR environment, the server renders the initial HTML. This process does not inherently understand or execute Webpack's code-splitting and chunk loading logic, potentially leading to discrepancies between server-rendered and client-rendered content.
- Mismatch Between Server and Client: If the server and client code differ (e.g., a chunk is loaded on the client but not on the server), this can lead to a hydration mismatch. React, for instance, will warn you about mismatches between server-rendered and client-rendered content.
- Lazy Loading Limitations: On the server, dynamically imported modules (using
import()) are resolved immediately. Lazy loading, a primary use case for Webpack's magic comments and dynamic imports, doesn't have the same effect on the server as it does on the client. On the server, all code is typically loaded and executed during the initial request. - Need for Additional Plugins or Configuration: To fully leverage dynamic imports and code splitting in SSR, you might need additional plugins or configurations. For example, using tools like
Loadable ComponentsorReact.lazywith SSR requires extra steps to ensure that dynamically loaded components are rendered correctly on the server and rehydrated on the client. - Prefetching and Preloading: While magic comments can be used to add prefetching or preloading hints, these hints only make sense in a browser context. In SSR, such hints are ignored since resource fetching is handled differently.
- Build Complexity: Incorporating SSR with dynamic imports and code splitting can make your build and deployment process more complex. You need to ensure that both the client and server builds are properly configured and synchronized, especially in terms of chunk names and paths.
- Development Environment Discrepancies: Sometimes, what works in a client-only development environment might behave differently in an SSR setup. This requires careful testing and configuration adjustments to ensure both environments align closely.
In summary, while Webpack's magic comments and dynamic imports are powerful tools, their use in SSR environments requires careful handling to avoid issues related to chunk loading, hydration mismatches, and build configuration complexities. It's important to test thoroughly and consider using additional tools and configurations to bridge the gap between client and server environments.
For instance, it can be used for a carousel of images and videos. More information about magic comments and the differences between prefetching and preloading can be found in webpack's official docs.
Example: Here is the difference of using the prefetch in our ImageSection and not using it:
Not using prefetch
import Media from "@components/Media";
import CallToActionContainer from "@components/molecules/CallToActionContainer";
import Section from "@components/Section";
import cn from "classnames";
import React from "react";
import { PersonalizationSectionWithPseudoId } from "@utils/personalization";

interface Props {
  sectionData: PersonalizationSectionWithPseudoId;
}

const Content: React.FC<Props> = ({ sectionData: imageSection }) => {
  const {
    imageUrl,
    media,
    mobileImageUrl,
    mobileMedia,
    ctaButton,
    title,
    subtitle,
    theme,
    cobrandedHeadline,
  } = imageSection;

  return (
    <Section
      id={imageSection.pseudoId}
      fullWidth
      theme={theme}
      className="flex container mx-auto max-w-[900px] py-10 laptop:py-14"
    >
      <CallToActionContainer
        title={title}
        subtitle={subtitle}
        ctaButton={ctaButton}
        paddingHorizontal="base"
        className="mx-auto max-w-full md:max-w-[900px]"
        cobrandedHeadline={cobrandedHeadline}
        cobrandedHeadlineWithHorizontalMargin
        ctaButtonClassName="mb-0 mt-10"
      >
        <Media
          kind="image"
          media={mobileMedia || media}
          url={mobileImageUrl || imageUrl}
          alt={title || subtitle}
          className={cn("mt-10 laptop:hidden", { "mb-10": ctaButton })}
          width={1200}
        />

        <Media
          kind="image"
          media={media}
          url={imageUrl}
          alt={title || subtitle}
          mediaClassName="rounded-[min(40px,calc(1.0*var(--sf-custom-radius)))]"
          className={cn("mt-10 hidden laptop:block", {
            "mb-10": ctaButton,
          })}
          width={720}
        />
      </CallToActionContainer>
    </Section>
  );
};

export default Content;
Using prefetch
import React, { lazy, Suspense } from 'react';
import CallToActionContainer from "@components/molecules/CallToActionContainer";
import Section from "@components/Section";
import cn from "classnames";
import { PersonalizationSectionWithPseudoId } from "@utils/personalization";

const Media = lazy(() => import(
  /* webpackPrefetch: true */
  "@customer-ui/components/Media"
));

interface Props {
  sectionData: PersonalizationSectionWithPseudoId;
}

const Content: React.FC<Props> = ({ sectionData: imageSection }) => {
  // ... rest of your component

  return (
    <Section /* ...props */>
      <CallToActionContainer /* ...props */>
        <Suspense fallback={<div>Loading media...</div>}>
          <Media /* ...props */ />
          {/* ... other uses of Media */}
        </Suspense>
      </CallToActionContainer>
    </Section>
  );
};

export default Content;
Example continuing to use our Globe component from the beginning of the post.
import * as React from 'react';

// Here we are using the /* webpackPrefetch: true */
const Globe = React.lazy(() => import(/* webpackPrefetch: true */ '../globe'));

function App() {
  const [showGlobe, setShowGlobe] = React.useState(false);

  return (
    <div
      style={{
        display: 'flex',
        alignItems: 'center',
        flexDirection: 'column',
        justifyContent: 'center',
        height: '100%',
        padding: '2rem',
      }}
    >
      <label style={{ marginBottom: '1rem' }}>
        <input
          type="checkbox"
          checked={showGlobe}
          onChange={e => setShowGlobe(e.target.checked)}
        />
        {' show globe'}
      </label>
      <div style={{ width: 400, height: 400 }}>
        <React.Suspense fallback={<div>loading globe...</div>}>
          {showGlobe ? <Globe /> : null}
        </React.Suspense>
      </div>
    </div>
  )
}

export default App;
Suspense
<Suspense> lets you display a fallback until its children have finished loading. You can wrap any section of your application with a Suspense boundary. Remember to always place the Suspense component around the content you want the loading state to replace. For instance, in tables, the Suspense should only wrap the table content, not the header or footer.
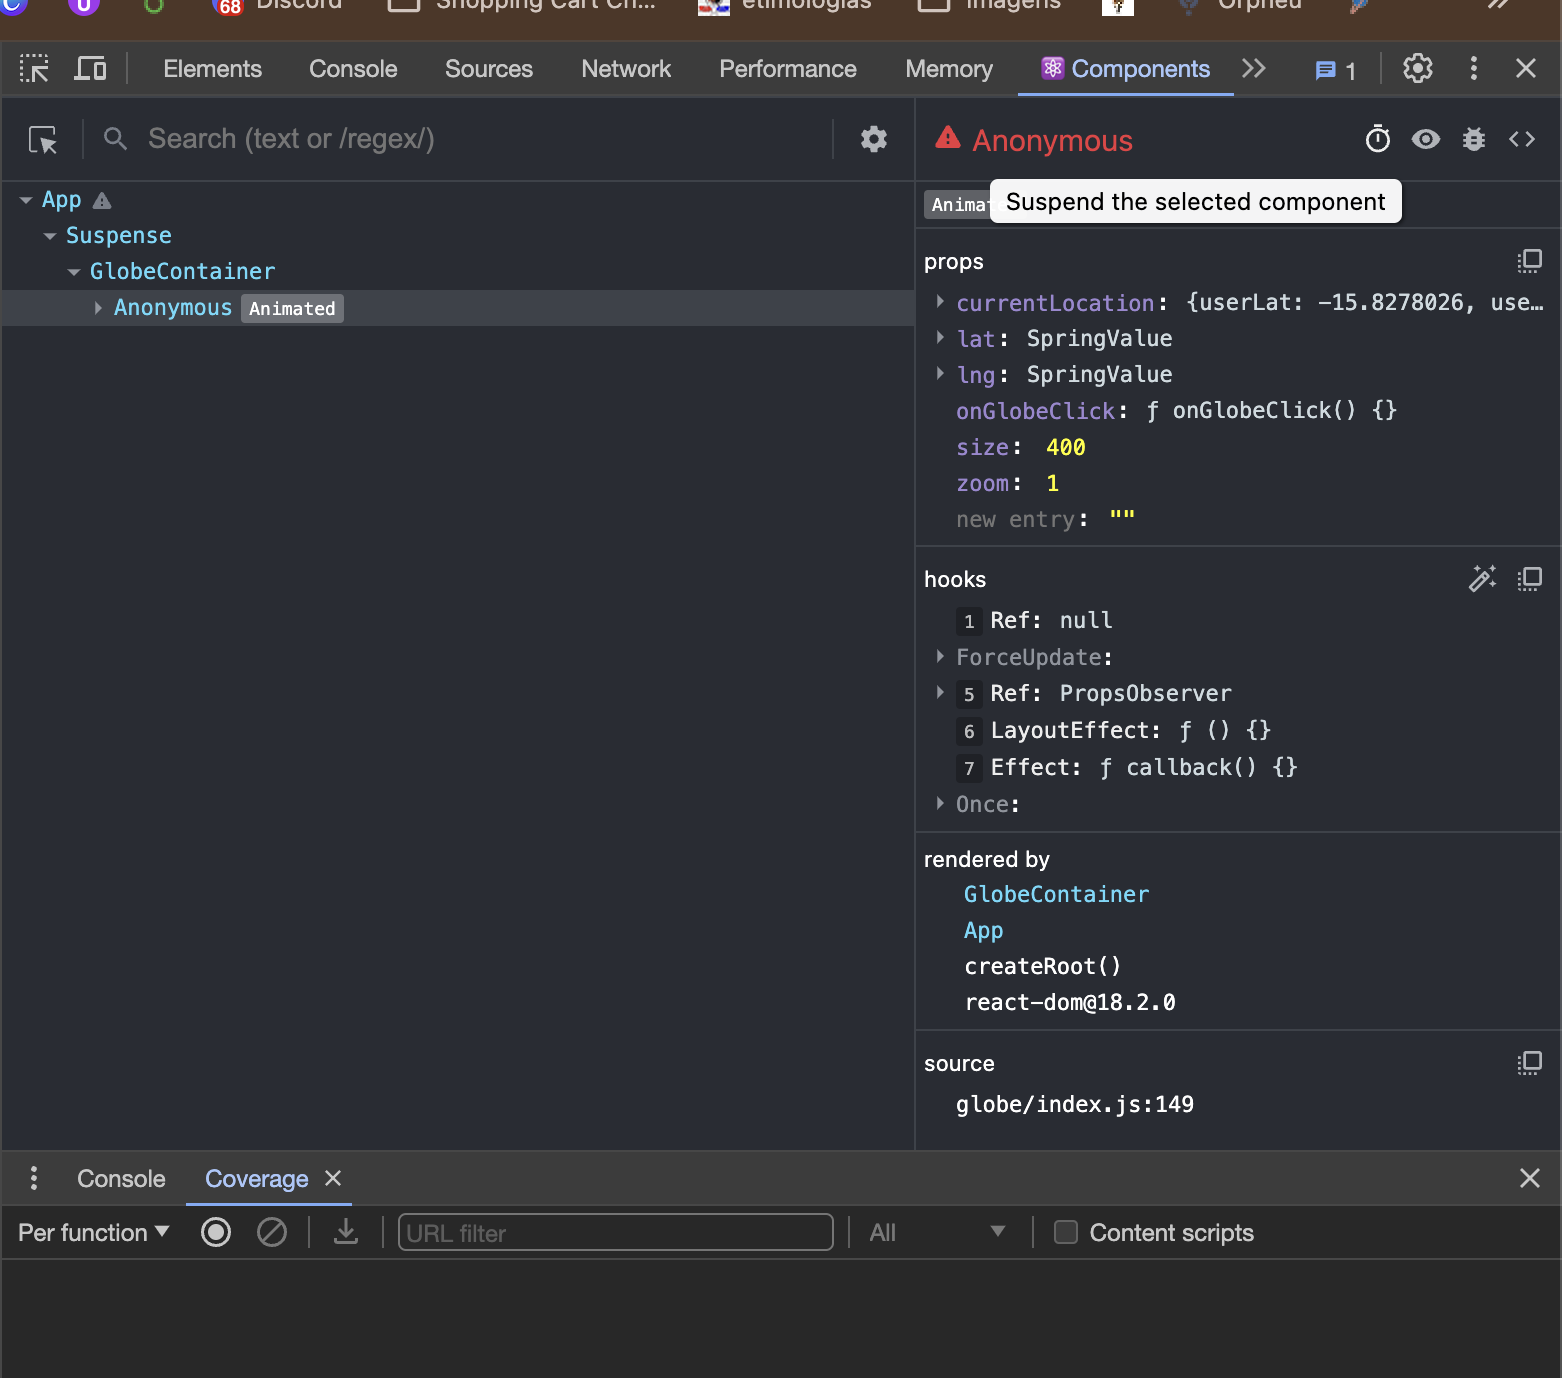
You can test Suspense usage using the official React Dev Tools Chrome extension. Simply go to the Components tab in the Dev Tools, inspect, and click on the stopwatch.

Coverage
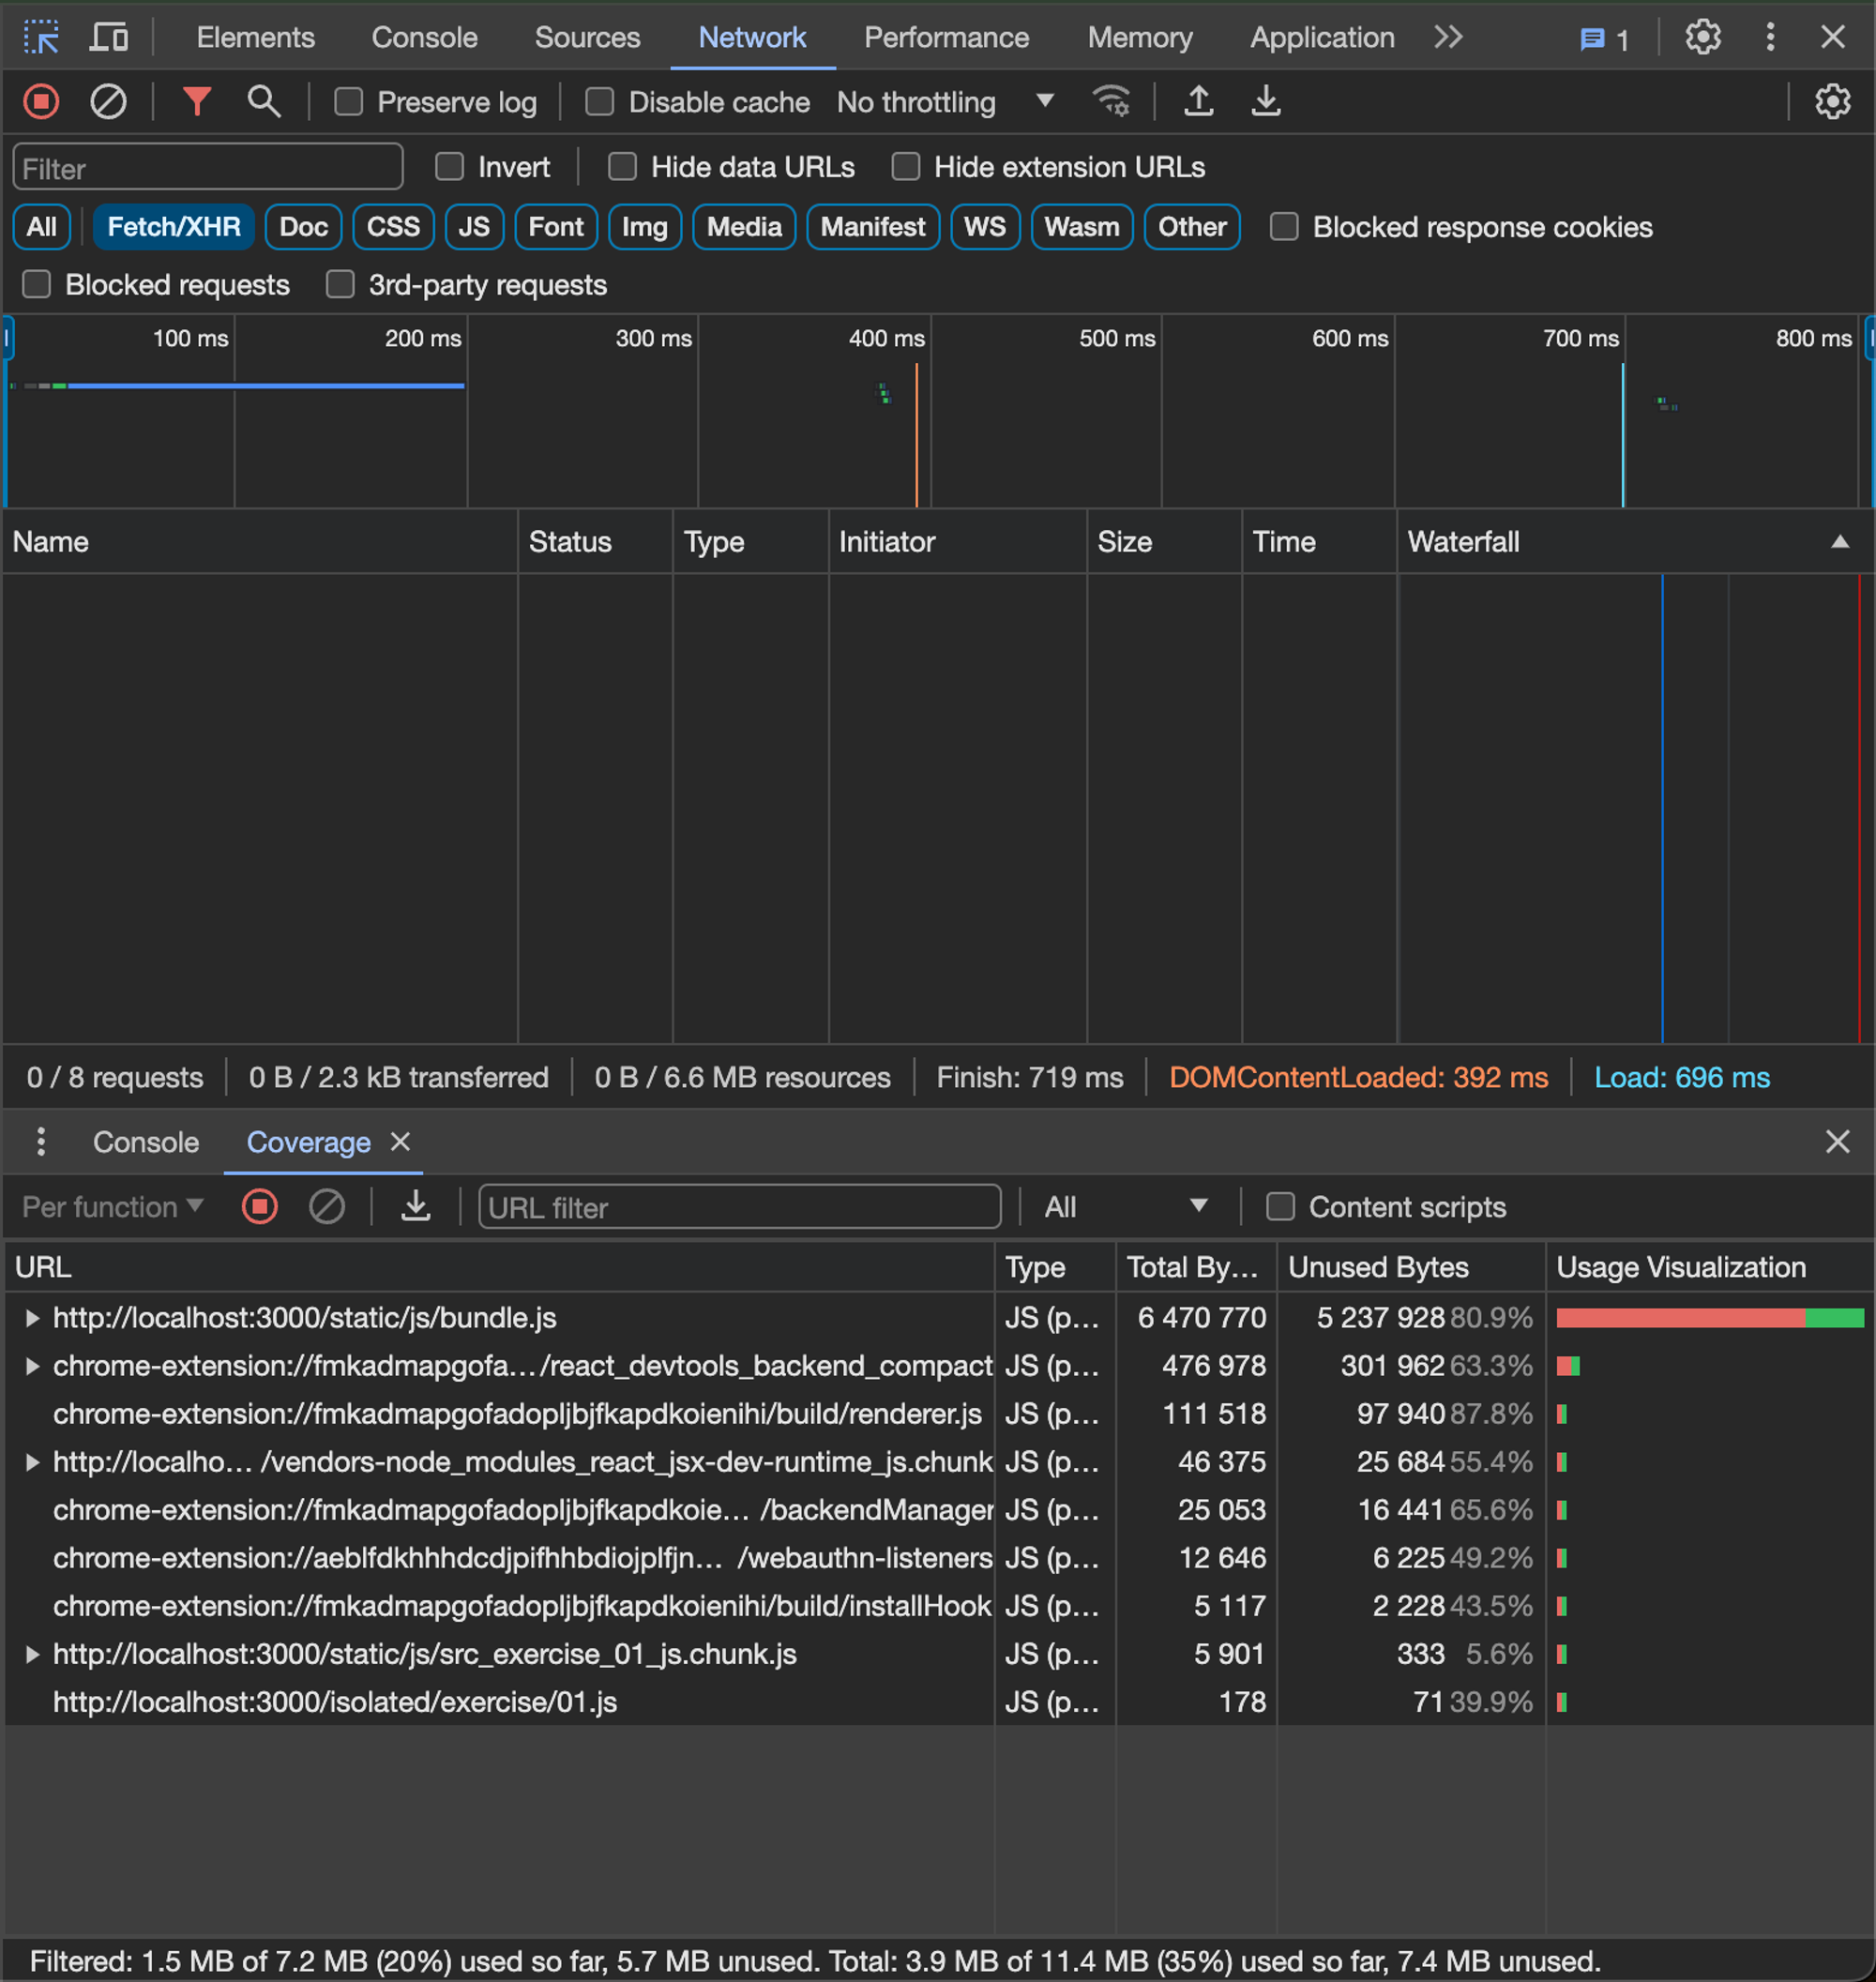
The Coverage tab in Chrome DevTools can help you find unused JavaScript and CSS code. Removing unused code can speed up your page load and save your mobile users cellular data. You can find more info about the coverage docs here on this link.
In the image below, you can see that much of the loaded content is unused when the page is served. Only 1.5 MB out of 7.2 MB (20%) has been used so far, which is quite low. This indicates an opportunity to reduce the bundle size, which can positively impact overall performance.

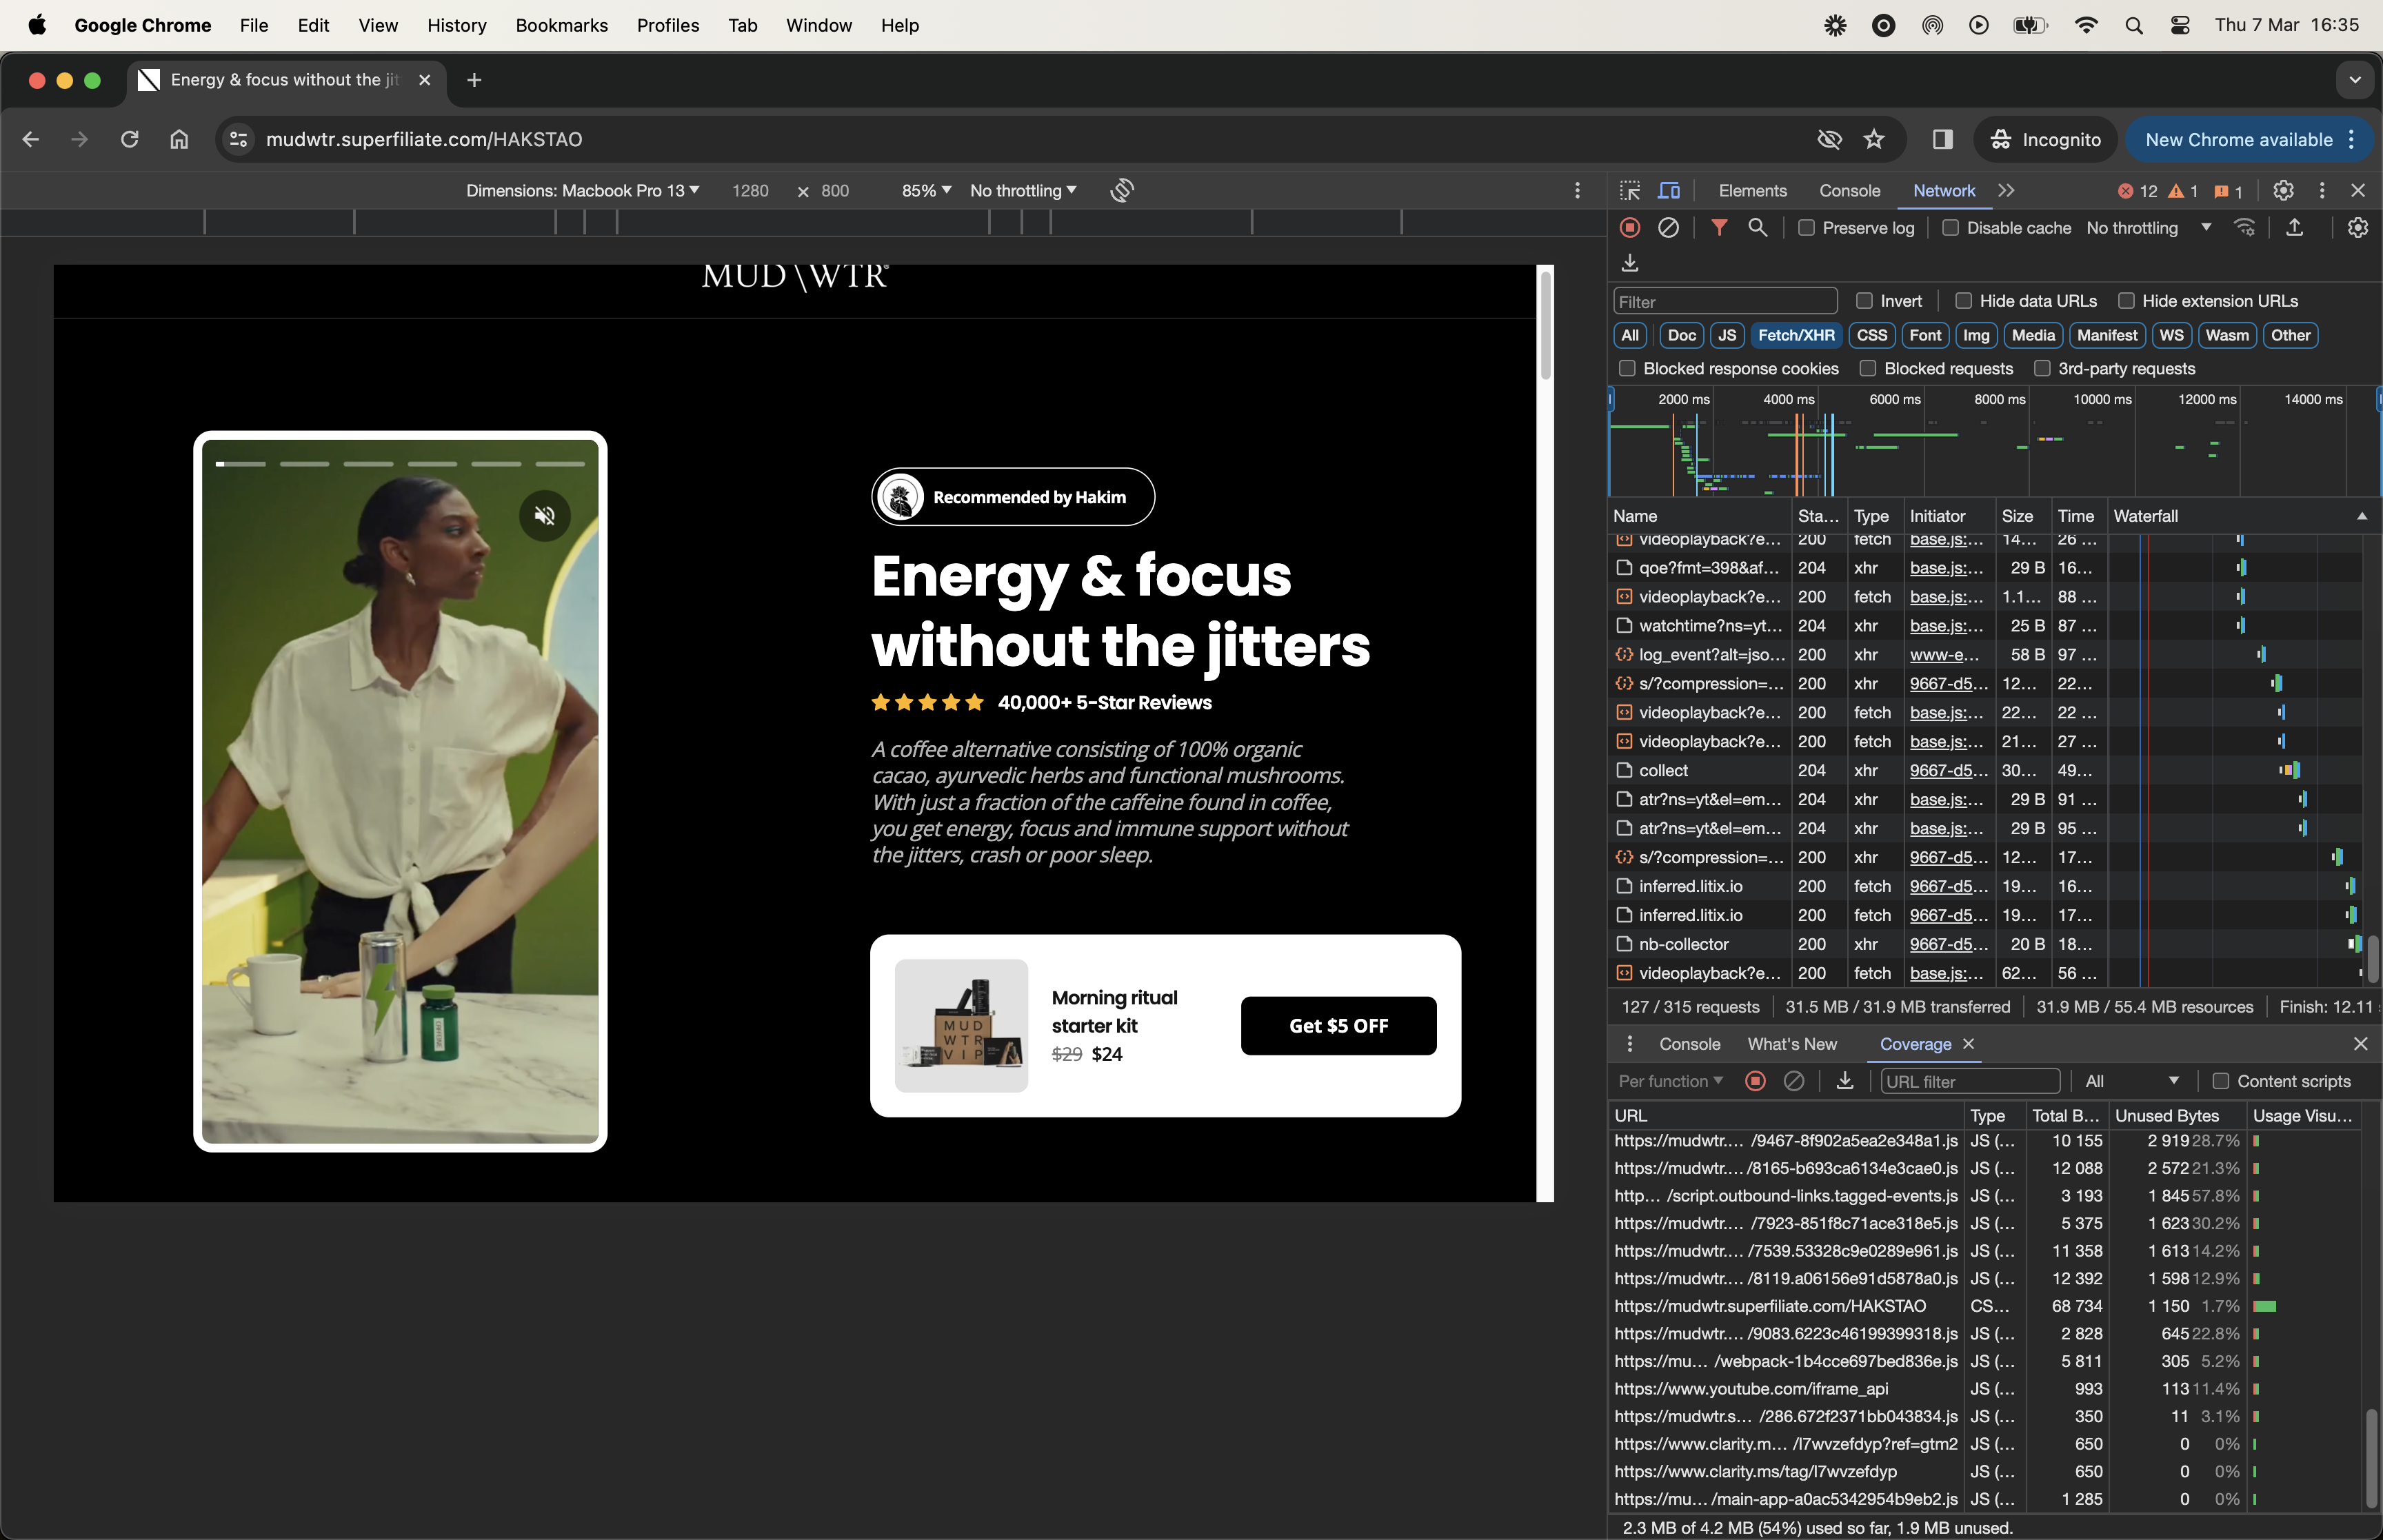
Using a real example from one of our landing pages, 2.3 MB out of 4.2 MB (54%) is not utilized upon page load.

Improving expensive calcuations with UseMemo
useMemo is a React Hook that stores the result of a calculation between re-renders. To store a calculation, invoke useMemo at the top level of your component. Note that useMemo should only be used for intensive CPU calculations, as it trades off using additional memory to store the value. You can find more on when to use memoization here on this article.
Using the Performance Tab
If you notice a feature in your application taking too long, and suspect something is off, it’s time to navigate to the performance tab. You can manually slow the CPU usage, record the behavior, and identify any function or process taking too long. Look for areas of improvement, make the necessary changes, and then rerun the experiment.
The image below provides an example. Notice how a slow request is indicated by a red bar over the request. By examining the functions called during this time, you can identify any particularly inefficient ones.
.png)
A common yet inefficient behavior we often observe is when a function has many children in the coverage. This could indicate that it's iterating over numerous items.
.png)
Taking the following function call for example:
const allItems = getItems(inputValue);If you have a large quantity of items, such as a JSON file with extensive data, and a heavy CPU calculation is needed to return allItems, you can use useMemo. This will only update the data if the input changes, preventing unnecessary calculations with every re-render.
const allItems = React.useMemo(() => getItems(inputValue), [inputValue]);After wrapping the assignment with useMemo, it now only takes 54ms, compared to the previous 312ms before the performance improvement.
.png)
The optimum frame rate is approximately 60 frames per second, which equates to 16ms (1000/60). To truly understand the user's experience, it's recommended to use the production build. This approach offers a more accurate understanding of the actual performance. In this case, the final performance measured was 22.9ms.
.png)
Web Worker
Web Workers provide a simple way for web content to run scripts in background threads, allowing tasks to be performed without interfering with the user interface.
Imagine if we could delegate the execution of complex JavaScript code to a separate process. This code would run and perform all the intensive logic operations independently. Once done, it could send the results back to the browser. This approach would relieve the main browser thread from handling complex tasks, offloading them to another process on the computer. This way, we can avoid any lag in the browser.
Web workers are advised for use when performing intense calculations. For example:
import { matchSorter } from 'match-sorter';
// this file has millions of cities
import cities from './us-cities.json';

const allItems = cities.map((city, index) => ({
  ...city,
  id: String(index),
}));

// for some reason workerize doesn't like export {getItems}// but it's fine with inline exports like this so that's what we're doing.export function getItems(filter) {
  if (!filter) {
    return allItems;
  }
  return matchSorter(allItems, filter, {
    keys: ['name'],
  });
}

// This is to avoid some issues https://github.com/kentcdodds/react-performance/issues/115export default class makeFilterCitiesWorker {}
Create a new file named workerized-filter-cities.js to utilize the web worker.
import makeFilterCitiesWorker from 'workerize!./filter-cities';

const { getItems } = makeFilterCitiesWorker();

export { getItems }
Fetch the data asynchronously and utilize the web worker.
const { data: allItems, run } = useAsync({ data: [], status: 'pending' });

React.useEffect(() => {
  run(getItems(inputValue))
}, [inputValue, run]);
We're using a Webpack loader called workerize for web workers, but there are alternative methods. Workerize converts our previous filter-cities module into a web worker and provides a factory function to create a web worker for this module, complete with all its exports.
Note that communication between a web worker and the browser's main thread is asynchronous due to the nature of the APIs. Thus, getItems is also asynchronous.
When the app launches, it executes the asynchronous getItems function. Once this function resolves, it triggers a re-render with useAsync, providing us with data for all the items.
Final takeaways
Some simple takeaways from what we've seen here in the post:
- Code Splitting Enhances Performance: By using code-splitting techniques like lazy loading, unnecessary code for the initial load can be minimized, enhancing app performance.
- Dynamic Imports for Lazy Loading: Dynamic imports can be used for lazily loading heavy content, allowing user interaction with parts of the app before the entire content is loaded.
- React.lazy and Suspense:
React.lazyandSuspensecomponents enable the rendering of a dynamic import as a standard component and provide fallback content during loading, respectively. - Applicability of Code-splitting: Code-splitting is particularly useful for heavy components that are not required during initial page rendering but may be needed later, like modals or large images.
- Eager Loading for User Interaction: Eager loading is useful for pre-loading content as a user shows intent to access it, such as scrolling near a section on a webpage.
- Webpack Prefetching and Preloading: Webpack's magic comments for prefetching and preloading help in optimizing resource loading based on user navigation patterns.
- Server-Side Rendering (SSR) Limitations: When using SSR, one must be cautious as dynamic loading and chunk handling differ, which can cause mismatches between server and client rendering.
- Suspense for Component Loading: Suspense allows for a smooth user experience by showing fallback content (like loading indicators) until the component is ready to render. You can combine it's use with other techniques to provide a better UX.
- Coverage Tool in Chrome DevTools: The Coverage tool can identify unused code, helping to reduce bundle size and improve performance.
- UseMemo for Optimization:
useMemocan be utilized for memorizing expensive calculations to avoid unnecessary computations during re-renders, improving overall performance. - Web Worker for Performance Optimization: Web Workers offer a robust solution for running scripts in background threads, preventing heavy computations from blocking the main thread. This leads to a smoother, more responsive user experience, especially for tasks involving intensive data processing or complex calculations. By offloading such tasks to a separate thread, web workers ensure the main thread, which handles user interactions and rendering, remains unimpeded. This is particularly beneficial in applications dealing with large datasets, complex algorithms, or real-time processing requirements.


